Add file
Home Core 5.6 functionality Page editing Add file
Adding files to your website page is a simple two step process and follows the same format as adding images.
Update your files and document links.

Step 1
Firstly either type the name of your file into your content block (example: Annual Report and Accounts 2013) or highlight the text/image which you would like the link to be.
Step 2
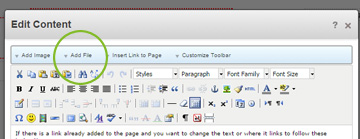
In the WYSIWYG editor, click the "Add File" link at the top. This will load up the file manager where you can select the file, search or upload a new file all from one interface.
Simply left click the file and select "Choose".
Change a hyperlink
If there is a link already added to the page and you want to change the text or where it links to follow these instructions.
- Enter edit mode and edit the content are where the link is located.
- Left click on the link and enter new text. If you're adding text to the end of a link, check when you're typing that it remains blue and underlined. If it's not in the same style as the rest of the link then delete the link and add it in again.
- To edit a link location, left click the link and two icons will be highlighted in the WYSIWYG editor.


- Left click the left hand side icon and in the first field enter the new URL.
- Click update and save your changes. Preview the page to check the link works.